关于线程 ---线程操作的主要方法
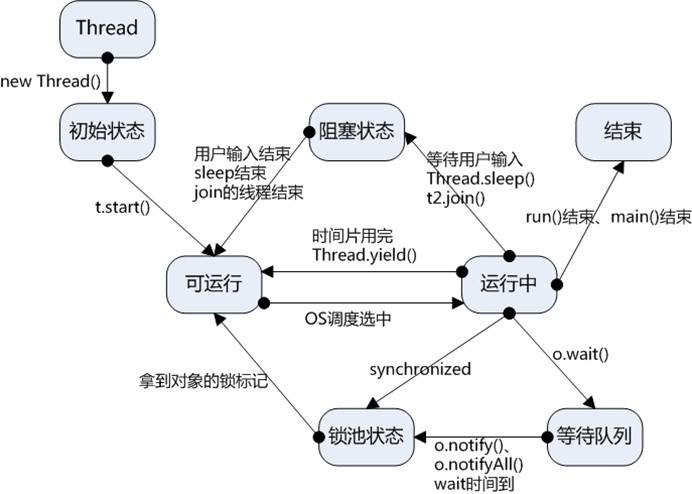
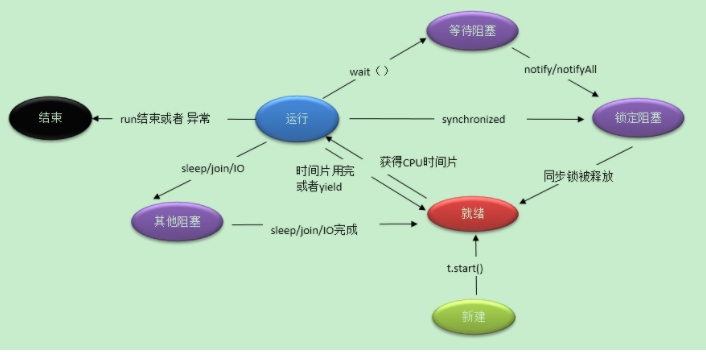
一:线程状态转换
二:Object中的线程操作方法 --- wait(),notify(),notifyAll()
① wait()方法
- wait()、notify()和notifyAll()方法是本地方法,并且为final方法,无法被重写。
- 调用某个对象的wait()方法能让当前线程阻塞,并且当前线程必须拥有此对象的monitor(即锁)。因此调用wait()方法必须在同步块或者同步方法中进行(synchronized块或者synchronized方法)。
- 调用某个对象的wait()方法,相当于让当前线程交出此对象的monitor,然后进入等待状态,等待后续再次获得此对象的锁(Thread类中的sleep方法使当前线程暂停执行一段时间,从而让其他线程有机会继续执行,但它并不释放对象锁);
② notify()方法
- 调用某个对象的notify()方法能够唤醒一个正在等待这个对象的monitor的线程,如果有多个线程都在等待这个对象的monitor,则只能唤醒其中一个线程,具体唤醒哪个线程则不得而知。
- 调用某个对象的notify()方法,当前线程也必须拥有这个对象的monitor,因此调用notify()方法必须在同步块或者同步方法中进行(synchronized块或者synchronized方法)。
③ notifyAll()方法
- 调用notifyAll()方法能够唤醒所有正在等待这个对象的monitor的线程;
【注】为何这三个不是Thread类声明中的方法,而是Object类中声明的方法?(当然由于Thread类继承了Object类,所以Thread也可以调用者三个方法)
答:由于每个对象都拥有monitor(即锁),所以让当前线程等待某个对象的锁,当然应该通过这个对象来操作了。而不是用当前线程来操作,因为当前线程可能会等待多个线程的锁,如果通过线程来操作,就非常复杂了。
三:java.util.concurrent.locks.Condition(接口)中的线程操作方法 --- await(),signal(),signalAll()
① Condition是在java 1.5中才出现的,它用来替代传统的Object的wait()、notify()实现线程间的协作,相比使用Object的wait()、notify(),使用Condition1的await()、signal()这种方式实现线程间协作更加安全和高效。因此通常来说比较推荐使用Condition。
② Condition依赖于Lock接口,生成一个Condition的基本代码是lock.newCondition()。
③ 调用Condition的await()和signal()方法,都必须在lock保护之内,就是说必须在lock.lock()和lock.unlock()之间才可以使用Conditon中的await()对应Object的wait(); Condition中的signal()对应Object的notify(); Condition中的signalAll()对应Object的notifyAll()。
四 java.lang.Thread类中的操作方法
① 线程名称
- 获取线程的名称 --- getName(),设置线程名称 --- setName()。
- 线程的名称一般在启动线程前设置,但也允许为运行的线程设置名称,允许两个Thread对象有相同名称,但是应该避免。
- 如果程序没有为线程指定名称,系统会自动为线程设置名称。
示例:
1 class MyThread implements Runnable{ // 实现Runnable接口 2 public void run(){ // 覆写run()方法 3 for(int i=0;i<3;i++){ 4 System.out.println(Thread.currentThread().getName() 5 + "运行,i = " + i) ; // 取得当前线程的名字,currentThread(),获取当前线程。 6 } 7 } 8 }; 9 public class ThreadNameDemo{10 public static void main(String args[]){11 MyThread mt = new MyThread() ; // 实例化Runnable子类对象12 new Thread(mt).start() ; // 系统自动设置线程名称13 new Thread(mt,"线程-A").start() ; // 手工设置线程名称14 new Thread(mt,"线程-B").start() ; // 手工设置线程名称15 new Thread(mt).start() ; // 系统自动设置线程名称16 new Thread(mt).start() ; // 系统自动设置线程名称17 }18 }; 运行结果:
线程-A运行,i = 0线程-B运行,i = 0Thread-1运行,i = 0Thread-0运行,i = 0Thread-0运行,i = 1Thread-0运行,i = 2Thread-1运行,i = 1线程-B运行,i = 1Thread-2运行,i = 0线程-A运行,i = 1Thread-2运行,i = 1线程-B运行,i = 2Thread-1运行,i = 2Thread-2运行,i = 2线程-A运行,i = 2
从效果看,指定的名称会自动出现,如果没有指定会发现线程使用自动编号完成,按照Thread-0,Thread-1.依次编号,实际上,肯定在类中存在static属性,用于记录编号。
②当前线程:CurrentThread():程序可以通过currentThread()方法取得当前正在运行的线程对象,
示例:
1 class MyThread implements Runnable{ // 实现Runnable接口 2 public void run(){ // 覆写run()方法 3 for(int i=0;i<3;i++){ 4 System.out.println(Thread.currentThread().getName() 5 + "运行,i = " + i) ; // 取得当前线程的名字 6 } 7 } 8 }; 9 public class CurrentThreadDemo{10 public static void main(String args[]){11 MyThread mt = new MyThread() ; // 实例化Runnable子类对象12 new Thread(mt,"线程").start() ; // 启动线程13 mt.run() ; // 直接调用run()方法14 }15 }; 运行结果:
运行结果:main运行,i = 0线程运行,i = 0main运行,i = 1线程运行,i = 1main运行,i = 2线程运行,i = 2
此时发现,程序中由主方法直接通过线程对象调用里面的run()方法,所以此时的结果包含一个"main",此线程就是由"mt.run()"产生的,因为调用此语句是由主方法完成的。
也就是说,主方法本身也是一个线程---主线程。
【注】既然主方法是以线程的形式呈现,则java启动时至少启动了两个线程。每当JAVA执行,都会启动一个JVM,每一个JVM都是在操作系统中启动一个线程。JAVA本身有垃圾回收机制,所以至少启动了两个线程:主线程,GC。
③ 判断线程是否在执行:isAlive()
示例:
1 class MyThread implements Runnable{ // 实现Runnable接口 2 public void run(){ // 覆写run()方法 3 for(int i=0;i<3;i++){ 4 System.out.println(Thread.currentThread().getName() 5 + "运行,i = " + i) ; // 取得当前线程的名字 6 } 7 } 8 }; 9 public class ThreadAliveDemo{10 public static void main(String args[]){11 MyThread mt = new MyThread() ; // 实例化Runnable子类对象12 Thread t = new Thread(mt,"线程"); // 实例化Thread对象13 System.out.println("线程开始执行之前 --> " + t.isAlive()) ; // 判断是否启动14 t.start() ; // 启动线程15 System.out.println("线程开始执行之后 --> " + t.isAlive()) ; // 判断是否启动16 for(int i=0;i<3;i++){17 System.out.println(" main运行 --> " + i) ;18 }19 // 以下的输出结果不确定20 System.out.println("代码执行之后 --> " + t.isAlive()) ; // 判断是否启动21 }22 }; 运行结果:
1 线程开始执行之前 --> false2 线程开始执行之后 --> true3 main运行 --> 04 main运行 --> 15 main运行 --> 26 线程运行,i = 07 代码执行之后 --> true8 线程运行,i = 19 线程运行,i = 2
④ 线程强制运行:join()
可以通过join()方法使得一个线程强制运行,线程强制运行期间,其他线程无法运行,必须等待此线程完成之后,才可以继续运行。
示例:
1 package Thread1; 2 class MyThread implements Runnable{ // 实现Runnable接口 3 public void run(){ // 覆写run()方法 4 for(int i=0;i<50;i++){ 5 System.out.println(Thread.currentThread().getName() 6 + "运行,i = " + i) ; // 取得当前线程的名字 7 } 8 } 9 };10 public class demo1{11 public static void main(String args[]){12 MyThread mt = new MyThread() ; // 实例化Runnable子类对象13 Thread t = new Thread(mt,"线程"); // 实例化Thread对象14 t.start() ; // 启动线程15 for(int i=0;i<50;i++){16 if(i>10){17 try{18 t.join() ; // 线程强制运行19 }catch(InterruptedException e){}20 }21 System.out.println("Main线程运行 --> " + i) ;22 }23 }24 }; 运行结果:
线程运行,i = 0Main线程运行 --> 0线程运行,i = 1Main线程运行 --> 1线程运行,i = 2Main线程运行 --> 2线程运行,i = 3线程运行,i = 4线程运行,i = 5线程运行,i = 6线程运行,i = 7线程运行,i = 8线程运行,i = 9Main线程运行 --> 3线程运行,i = 10Main线程运行 --> 4线程运行,i = 11线程运行,i = 12线程运行,i = 13Main线程运行 --> 5线程运行,i = 14Main线程运行 --> 6线程运行,i = 15线程运行,i = 16线程运行,i = 17线程运行,i = 18线程运行,i = 19Main线程运行 --> 7线程运行,i = 20Main线程运行 --> 8线程运行,i = 21Main线程运行 --> 9线程运行,i = 22Main线程运行 --> 10线程运行,i = 23线程运行,i = 24线程运行,i = 25线程运行,i = 26线程运行,i = 27线程运行,i = 28线程运行,i = 29线程运行,i = 30线程运行,i = 31线程运行,i = 32线程运行,i = 33线程运行,i = 34线程运行,i = 35线程运行,i = 36线程运行,i = 37线程运行,i = 38线程运行,i = 39线程运行,i = 40线程运行,i = 41线程运行,i = 42线程运行,i = 43线程运行,i = 44线程运行,i = 45线程运行,i = 46线程运行,i = 47线程运行,i = 48线程运行,i = 49Main线程运行 --> 11Main线程运行 --> 12Main线程运行 --> 13Main线程运行 --> 14Main线程运行 --> 15Main线程运行 --> 16Main线程运行 --> 17Main线程运行 --> 18Main线程运行 --> 19Main线程运行 --> 20Main线程运行 --> 21Main线程运行 --> 22Main线程运行 --> 23Main线程运行 --> 24Main线程运行 --> 25Main线程运行 --> 26Main线程运行 --> 27Main线程运行 --> 28Main线程运行 --> 29Main线程运行 --> 30Main线程运行 --> 31Main线程运行 --> 32Main线程运行 --> 33Main线程运行 --> 34Main线程运行 --> 35Main线程运行 --> 36Main线程运行 --> 37Main线程运行 --> 38Main线程运行 --> 39Main线程运行 --> 40Main线程运行 --> 41Main线程运行 --> 42Main线程运行 --> 43Main线程运行 --> 44Main线程运行 --> 45Main线程运行 --> 46Main线程运行 --> 47Main线程运行 --> 48Main线程运行 --> 49
⑤ 线程的休眠
在线程中允许一个线程进行暂时的休眠,直接使用Thread.sleep()方法即可。
sleep定义格式:
public static void sleep(long milis,int nanos) throws InterruptedException
static --- 说明可以由Thread类名称调用。
Throws ---表示如果有异常要在调用此方法处处理异常。所以sleep()方法要有InterruptedException 异常处理,而且sleep()调用方法通常为Thread.sleep(500) ;形式。
示例:
1 package Thread1; 2 class MyThread implements Runnable{ // 实现Runnable接口 3 public void run(){ // 覆写run()方法 4 for(int i=0;i<50;i++){ 5 try{ 6 Thread.sleep(500) ; // 线程休眠 7 }catch(InterruptedException e){} 8 System.out.println(Thread.currentThread().getName() 9 + "运行,i = " + i) ; // 取得当前线程的名字10 }11 }12 };13 public class demo1{14 public static void main(String args[]){15 MyThread mt = new MyThread() ; // 实例化Runnable子类对象16 Thread t = new Thread(mt,"线程"); // 实例化Thread对象17 t.start() ; // 启动线程18 }19 }; 会发现运行过程中,线程名是一个个间隔一定时间出来的,这里达到了休眠效果。
⑥ 线程的中断
一个线程可以被另一个线程中断其操作的状态,使用 interrupt()方法完成。
1 package Thread1; 2 class MyThread implements Runnable{ // 实现Runnable接口 3 public void run(){ // 覆写run()方法 4 System.out.println("1、进入run()方法") ; 5 try{ 6 Thread.sleep(10000) ; // 线程休眠10秒 7 System.out.println("2、已经完成了休眠") ; 8 }catch(InterruptedException e){ 9 System.out.println("3、休眠被终止") ;10 }11 System.out.println("4、run()方法正常结束") ;12 }13 };14 public class demo1{15 public static void main(String args[]){16 MyThread mt = new MyThread() ; // 实例化Runnable子类对象17 Thread t = new Thread(mt,"线程"); // 实例化Thread对象18 t.start() ; // 启动线程19 try{20 Thread.sleep(2000) ; // 线程休眠2秒21 }catch(InterruptedException e){22 System.out.println("3、休眠被终止") ;23 }24 t.interrupt() ; // 中断线程执行25 }26 };
运行结果:
1、进入run()方法3、休眠被终止4、run()方法正常结束
会看到,在1到3的时候会因为线程休眠2秒而卡顿了一下。
但是,既然线程中断了,那么4,这句话不应该打出来的,因此要在3,线程被终止处添加一句话rutrun,表示返回调用处。
1 package Thread1; 2 class MyThread implements Runnable{ // 实现Runnable接口 3 public void run(){ // 覆写run()方法 4 System.out.println("1、进入run()方法") ; 5 try{ 6 Thread.sleep(10000) ; // 线程休眠10秒 7 System.out.println("2、已经完成了休眠") ; 8 }catch(InterruptedException e){ 9 System.out.println("3、休眠被终止") ;10 return; //返回调用处11 }12 System.out.println("4、run()方法正常结束") ;13 }14 };15 public class demo1{16 public static void main(String args[]){17 MyThread mt = new MyThread() ; // 实例化Runnable子类对象18 Thread t = new Thread(mt,"线程"); // 实例化Thread对象19 t.start() ; // 启动线程20 try{21 Thread.sleep(2000) ; // 线程休眠2秒22 }catch(InterruptedException e){23 System.out.println("3、休眠被终止") ;24 }25 t.interrupt() ; // 中断线程执行26 }27 }; 运行结果:
1、进入run()方法3、休眠被终止
⑦ 后台线程
在Java中,只要一个线程没有执行完(一个线程在运行),则整个Java的进程不会消失,所以此时可以设置一个后台线程,这样即使java线程结束了,后台线程依旧会继续执行。要想实现这个操作,要使用setDaemon()方法完成。t.setDaemon(true) ;
1 class MyThread implements Runnable{ // 实现Runnable接口 2 public void run(){ // 覆写run()方法 3 int i=0; 4 while(true){ //设置死循环,这样来实现线程不断运行,设置后台运行。 5 System.out.println(Thread.currentThread().getName() + "在运行。"+i) ; 6 } 7 } 8 }; 9 public class ThreadDaemonDemo{10 public static void main(String args[]){11 MyThread mt = new MyThread() ; // 实例化Runnable子类对象12 Thread t = new Thread(mt,"线程"); // 实例化Thread对象13 t.setDaemon(true) ; // 此线程在后台运行14 t.start() ; // 启动线程15 }16 }; ⑧ 线程的优先级:getPriority();
优先级分为最低,最高,普通三个(Thread.MIN_PRIORITY,Thread.MAX_PRIORITY,Thread.NORM_PRIORITY)
设置优先级:
1 MyThread t1=new MyThread();2 Thread t3 = new Thread(t1,"线程C") ;//实例化线程对象3 t3.setPriority(Thread.MIN_PRIORITY) ;//设置优先级为最低
示例:
1 package Thread1; 2 class MyThread implements Runnable{ // 实现Runnable接口 3 public void run(){ // 覆写run()方法 4 for(int i=0;i<5;i++){ 5 try{ 6 Thread.sleep(500) ; // 线程休眠 7 }catch(InterruptedException e){} 8 System.out.println(Thread.currentThread().getName() 9 + "运行,i = " + i) ; // 取得当前线程的名字10 }11 }12 };13 public class demo1{14 public static void main(String args[]){15 Thread t1 = new Thread(new MyThread(),"线程A") ; // 实例化线程对象16 Thread t2 = new Thread(new MyThread(),"线程B") ; // 实例化线程对象17 Thread t3 = new Thread(new MyThread(),"线程C") ; // 实例化线程对象18 t1.setPriority(Thread.MIN_PRIORITY) ; // 优先级最低19 t2.setPriority(Thread.MAX_PRIORITY) ; // 优先级最低20 t3.setPriority(Thread.NORM_PRIORITY) ; // 优先级最低21 t1.start() ; // 启动线程22 t2.start() ; // 启动线程23 t3.start() ; // 启动线程24 }25 }; 运行结果:
1 线程B运行,i = 0 2 线程C运行,i = 0 3 线程A运行,i = 0 4 线程B运行,i = 1 5 线程C运行,i = 1 6 线程A运行,i = 1 7 线程B运行,i = 2 8 线程A运行,i = 2 9 线程C运行,i = 210 线程B运行,i = 311 线程C运行,i = 312 线程A运行,i = 313 线程B运行,i = 414 线程C运行,i = 415 线程A运行,i = 4
【注】主方法的优先级:NORM_PRIORITY.
1 package Thread1; 2 public class demo1{ 3 public static void main(String args[]){ 4 System.out.println("主方法的优先级:" + 5 Thread.currentThread().getPriority()) ; // 取得主方法的优先级 6 System.out.println("MAX_PRIORITY = " + Thread.MAX_PRIORITY) ; 7 System.out.println("NORM_PRIORITY = " + Thread.NORM_PRIORITY) ; 8 System.out.println("MIN_PRIORITY = " + Thread.MIN_PRIORITY) ; 9 }10 }; 运行结果:
主方法的优先级:5MAX_PRIORITY = 10NORM_PRIORITY = 5MIN_PRIORITY = 1
由此可知,主方法优先级是5,也就是普通优先级,而且主方法是一个线程对象。
⑨ 线程的礼让:yield()方法实现线程的礼让。
1 package Thread1; 2 class MyThread implements Runnable{ // 实现Runnable接口 3 public void run(){ // 覆写run()方法 4 for(int i=0;i<5;i++){ 5 try{ 6 Thread.sleep(500) ; //休眠一下 7 }catch(Exception e){} 8 System.out.println(Thread.currentThread().getName() 9 + "运行,i = " + i) ; // 取得当前线程的名字10 if(i==2){11 System.out.print("线程礼让:") ;12 Thread.currentThread().yield() ; // 首先获取当前线程,然后线程礼让13 }14 }15 }16 };17 public class demo1{18 public static void main(String args[]){19 MyThread my = new MyThread() ; // 实例化MyThread对象20 Thread t1 = new Thread(my,"线程A") ;21 Thread t2 = new Thread(my,"线程B") ;22 t1.start() ;23 t2.start() ;24 }25 }; 运行结果:
线程A运行,i = 0线程B运行,i = 0线程B运行,i = 1线程A运行,i = 1线程A运行,i = 2线程礼让:线程B运行,i = 2线程礼让:线程A运行,i = 3线程B运行,i = 3线程A运行,i = 4线程B运行,i = 4